
The most fun I've had so far this holiday season was making the melting snowmen cookies that I found on Pinterest. (Sorry family, that not a slam to any gathering we've had so far...)
I made up instructions based on Pinterest pics I'd seen of the finished product. Since others have been looking for the "recipe", I figured I'd write out the instructions for you all here today:
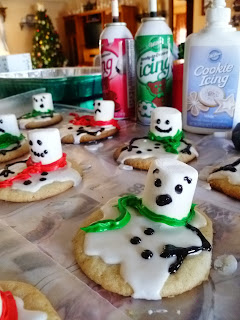
What you'll need: 1.) Sugar cookie dough (or ingredients if you're showing off), 2.) White cookie icing, 3.) Colored decorating frosting. I used red and green for the scarves and black for the face, buttons and arms. Most important is that you choose a black frosting that comes with a fine tip; 4.) Large s'more-sized marshmellows. That's it!

Step One: Make your favorite sugar cookies. From scratch, break-off, cut-off, doesn't matter. You're going to impress people with your hilarity here, not your baking skills. I used the Pillsbury break-off kind. If you go that route, please realize that the cookies, as they're packaged, will be too small to accomodate the giant marshmellow. My pack came with 24 cookies. I cut 8 in half and rolled together 1.5 precut cookies to form a new, larger, dough ball for each. (Rolling the dough in a ball will also make the finished product nice and round.) For those fractionally impared, that will give you 16 finished cookies.
Step Two: Heat up the cookie icing following the directions on the back. I used Wilton's 10 oz white cookie icing tube, which was exactly enough for my 16 cookies. Once cookies have cooled, start squirting! I went haphazard style on my first few, but then realized that crossing back and forth in a flower-like or star pattern caused the glaze to melt as nicely as melting snow. You don't have to overdo it either. Don't try to cover every inch of the cookie. Once you've drawn your pattern, the blank spaces fill in quite nicely since this is more of a glaze medium we're working with. You'll see the spots you'll need to fill in within seconds. Don't waste your glaze! And, for heaven's sake, don't just frost the cookies all the way across like you normally do. These snowmen are dying and it has to be hilarious! If they don't carry the Wilton's (or a similar product) in your area, I'd recommend making your own glaze and using a pastry bag for application. If you use cake frosting from the can, you won't get the same effect. Don't say I didn't warn you!
Step Three: Add the marshmellow quickly, before the glaze sets. The glaze serves as the adhesive to keep your marshmellow on. These snowmen may be dying, but let them die with the diginity of having their heads attached. Don't place the marshmellow in the center, either. Put it more toward one edge so you can draw the body later on.

Step Four: Go to town! Wait, put the car keys down. Stay in the kitchen. That was just an expression meaning "Start having fun!" Draw the scarves on first. I used Wilton's icing in red and green that comes in the aerosol cans. I used the leaf tip for a more scarfy effect. Next draw the face, buttons and arms. (Don't forget the expressiveness of eyebrows!) I used some sort of black sparkle gel frosting that came in a little tube for this. It was the only kind of black icing I could find this time of year. Think ahead at Halloween time if you'd like more black decorative frosting options and buy early.

Step Five: Think of the children. I was having a grand ol' time make devastated-looking Frosties, but then I remember Frosty. And, all the kids that will be at the party I'm bringing these to. And, how they might begin to cry when they see I've baked Frosty after he'd already escaped from that evil magician. So I added a few smiley faces. Some snowmen like the sun! (See the movie Frozen for reference.) They think melting is quite ticklish. Smiling cookies are for the children. (Except maybe the one above on on the right. He appears to have suffered a gunshot wound to the head, due to icing not being my best medium.)
Step Six: Have a jolly holiday!
I made up instructions based on Pinterest pics I'd seen of the finished product. Since others have been looking for the "recipe", I figured I'd write out the instructions for you all here today:
What you'll need: 1.) Sugar cookie dough (or ingredients if you're showing off), 2.) White cookie icing, 3.) Colored decorating frosting. I used red and green for the scarves and black for the face, buttons and arms. Most important is that you choose a black frosting that comes with a fine tip; 4.) Large s'more-sized marshmellows. That's it!

Step Two: Heat up the cookie icing following the directions on the back. I used Wilton's 10 oz white cookie icing tube, which was exactly enough for my 16 cookies. Once cookies have cooled, start squirting! I went haphazard style on my first few, but then realized that crossing back and forth in a flower-like or star pattern caused the glaze to melt as nicely as melting snow. You don't have to overdo it either. Don't try to cover every inch of the cookie. Once you've drawn your pattern, the blank spaces fill in quite nicely since this is more of a glaze medium we're working with. You'll see the spots you'll need to fill in within seconds. Don't waste your glaze! And, for heaven's sake, don't just frost the cookies all the way across like you normally do. These snowmen are dying and it has to be hilarious! If they don't carry the Wilton's (or a similar product) in your area, I'd recommend making your own glaze and using a pastry bag for application. If you use cake frosting from the can, you won't get the same effect. Don't say I didn't warn you!
Step Three: Add the marshmellow quickly, before the glaze sets. The glaze serves as the adhesive to keep your marshmellow on. These snowmen may be dying, but let them die with the diginity of having their heads attached. Don't place the marshmellow in the center, either. Put it more toward one edge so you can draw the body later on.

Step Four: Go to town! Wait, put the car keys down. Stay in the kitchen. That was just an expression meaning "Start having fun!" Draw the scarves on first. I used Wilton's icing in red and green that comes in the aerosol cans. I used the leaf tip for a more scarfy effect. Next draw the face, buttons and arms. (Don't forget the expressiveness of eyebrows!) I used some sort of black sparkle gel frosting that came in a little tube for this. It was the only kind of black icing I could find this time of year. Think ahead at Halloween time if you'd like more black decorative frosting options and buy early.

Step Five: Think of the children. I was having a grand ol' time make devastated-looking Frosties, but then I remember Frosty. And, all the kids that will be at the party I'm bringing these to. And, how they might begin to cry when they see I've baked Frosty after he'd already escaped from that evil magician. So I added a few smiley faces. Some snowmen like the sun! (See the movie Frozen for reference.) They think melting is quite ticklish. Smiling cookies are for the children. (Except maybe the one above on on the right. He appears to have suffered a gunshot wound to the head, due to icing not being my best medium.)

Step Six: Have a jolly holiday!
No comments:
Post a Comment